New this month – enhanced recall reminders, scheduling and invoice enhancements, and a new online training course for NaVetor!
View Recall Reminders in My Tasks
From the main dashboard, the My Tasks area has been updated to include Recall Reminders that are assigned to that specific user.
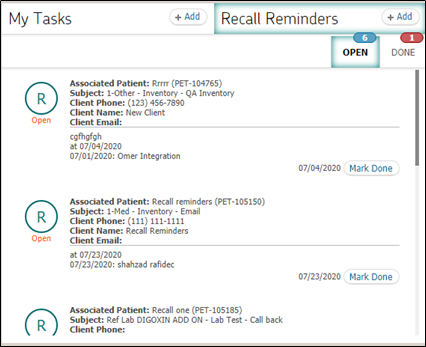
Standard information, such as the patient the recall is for, the reason/subject, client name, and email are listed. The description will also show any instructions, due date, and follow-up comments that staff have added. Each reminder in the list will also have a “Mark Done” button, so it can be removed from the user’s task list.
If you click on the recall to view it, all staff tied to that recall will be displayed. The “ Mark Done” button will be available from here as well.
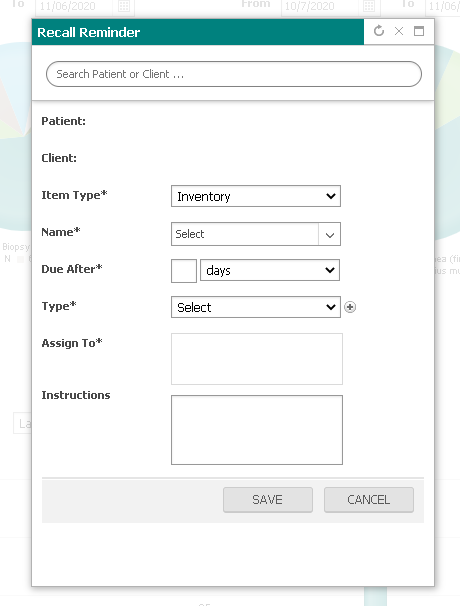
At the top of the Task List, on the Recall Reminders Tab, there is also an option to Add an additional recall to the list. The following screen will appear when that button is selected:
Backdate Invoice Line Items
Dates of items added to a plan or manual invoice can now be changed to an earlier date. If a patient was seen over a weekend or if charges were not entered on a particular day, they can now reflect the appropriate service date. Please Note: items added through the Treatment Sheet will NOT be able to be changed.
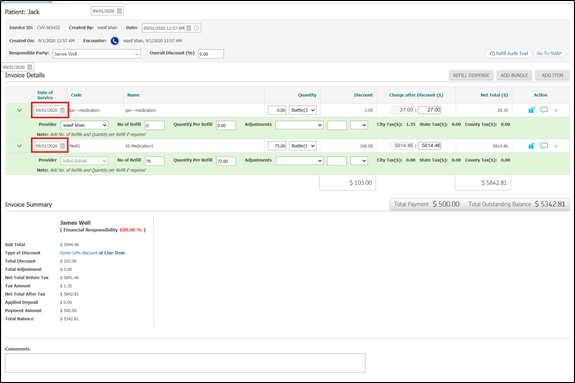
Here are a couple of exceptions:
- You will not be able to select a date that is earlier than the invoice date.
- You will not be able to select a future date for the item.
Dates can also be changed on items added through refills and bundles. (This includes both flat fee and non-flat fee).
If there are items linked to codes, those dates will reflect the date of the item as well. Also, if the invoice has been finalized, the dates can not be changed.
Automatic Scheduler
When opening the scheduler now, the screen will automatically scroll to the current time and appointments displayed at that time. The time color will show in a light green background.
When you are using the Day or Week View, the scrolling will automatically take place and go to the current time at the practice. If you add an appointment for a different time on that day in the Scheduler, once the appointment is saved it will NOT scroll back to the current time.
In addition, you can now change the “scale” of the scheduler to 5-minute increments. This setting can be found in the upper-right-hand corner of the scheduler.
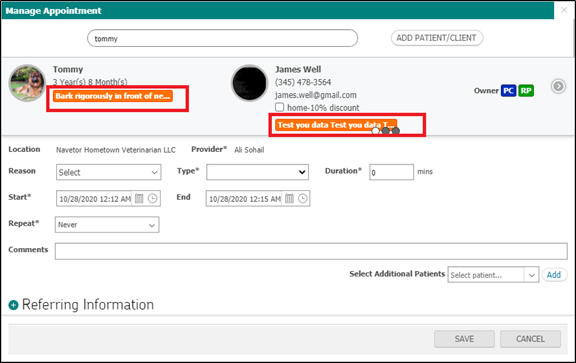
Lastly, client and patient alerts now display when scheduling appointments. If a client or patient has any information entered in the custom alerts field, this information will now show when an appointment is being scheduled.
Set Default Provider for Boarding Reservations
When scheduling a boarding reservation, a practice can now set a default provider to pull in for those reservations. To do this, go to Settings > Admin > My Practice > Practice Location. On the location screen there is a drop-down to select the provider to use as the default.
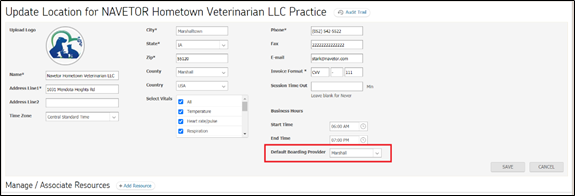
When adding a new boarding reservation, the default provider will automatically appear in the Provider drop-down box.

Showing Resources as Providers on Scheduler
In addition to provider names having columns on the scheduler, you can now create practice resources such as Exam Rooms, X-Ray, Ultrasound, and etc. to have their own columns in which to schedule appointments.
To create the new resource, you will go to Settings > Admin > My Practice > Practice. Then click on the location for the practice. At the bottom of the screen where the Manage/Associate Resource section is, click on “Add Resource.”
Type in the name for your resource and make sure for the Resource Type you select Scheduler Resource. If you don’t choose this, the resource will NOT show up as an available option on the scheduler
On the Scheduler screen you will now notice that the provider resources are now grouped at the top, and a seperate section is available for Resources. The resource you just added should now be displayed here. To have that resource show as a column on the scheduler, just check the box. When you select a time slot in that column, the column name will show as the provider/resource for the appointment.
Other tools that you use, such as Bulk Transfer, can be used for the resource. Appointment blocks can be created in these columns as well. If appointments are there when the block is created, the appointments will be moved to the Affected Appointments area for review. The resource available will be displayed on the Block Appointment pop-up.
The Main Practice Dashboard will also reflect the resource in the appointment listings:
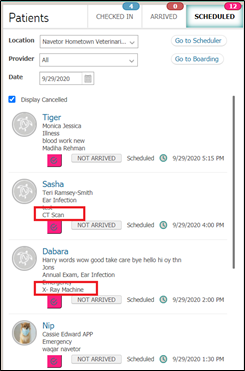
Future, Cancelled, and No-Show Appointments in the Client and Patient Dashboards are updated.
In Patient Tracking, the category and resource for the checked-in appointment will display. If a patient has been admitted, the category and resource should be selected on the admission form.
Refunding Deposits
On the Deposits screen, there is now an icon for refunding deposits which were not voided. When you click on the refund icon, a pop-up will appear.
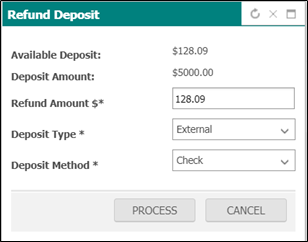
The screen will show the total available deposits (not editable). This should encompass all deposits. The Deposit Amount should reflect the deposit amount that was selected in the Deposits screen. The Refund Amount is auto-filled. It will have a maximum refund amount that could be used, but if the user wants to, they can change this to a lower amount than what was pulled in.
For the Payment Type & Method, it can be the same as what was used at the time the deposit was made. It can also be processed as an external payment, such as Check/Cash.
When the Process button is clicked after all fields have been entered, the refund will be processed. After processing is complete the reversed amount will show in the deposit list, and the action button will no longer be available.
When going to the payment screen, the information will be displayed as follows:
- If the payment was completed through the deposit there are a couple of scenarios. First if there was a single deposit, or if all deposits that have been used have the same payment method, the payment method will show the same as what was used for the deposit.
- If multiple deposits were used for the payment, the most recent deposit’s payment method will be displayed.
- If a partial payment was made, it will reflect the payment method of the deposit that was applied.
Invoice Detail Available on Statements
If you need invoice detail included on a monthly statement, there is now an option in settings that will allow for that information to be displayed.
Go to Settings > Admin > My Practice > Practice Settings. Under Statement Reports, select Invoice Items to have the invoice detail display on the statements. Once this has been configured, the monthly statements will show the details of invoices completed that month.
Apply Partial Credit for Invoice Payments
In the payment screen when you select client credit as the payment, or through client payment have multiple invoices to apply credits to, you will now be able to apply a credit even if it’s more than the actual invoice amount.
If the entire amount of the credit isn’t used, the remainder of the credit can be applied to future invoices.
Apply Multiple Payment Types to an Invoice
When making a payment from the invoice screen you will now be able to process multiple payment types without needing to return to the invoice screen to select the payment option again.
On the payment screen there is a new button that has been added named “Process & Pay More.” When you have filled in the information for the first payment, if you wish to apply a payment with another payment type select the “Process & Pay More” button. This will process the first payment and keep you on the payment screen so you can apply an additional payment. If the payment is processed through Global Payments, NaVetor will show the payment receipt in a new tab and remain on the payment screen.

Online Training Course
Needing to train a new staff member or looking for continuing education for your reception staff? We are excited to announce the release of our first online role-based training course. Our training team has put together a reception course built to set you and/or your staff up for success. This training course is 100% self-paced.
As a friendly reminder, our support team is here to help.
You can reach us through the Live Chat tool within NaVetor, by email at support@navetor.com, or by phone at 833-628-3867.

