They just keep on coming! We’ve been listening to your feedback and working hard to make NaVetor the most thoughtful, intuitive veterinary practice management software available. Here’s a rundown of the latest software updates.
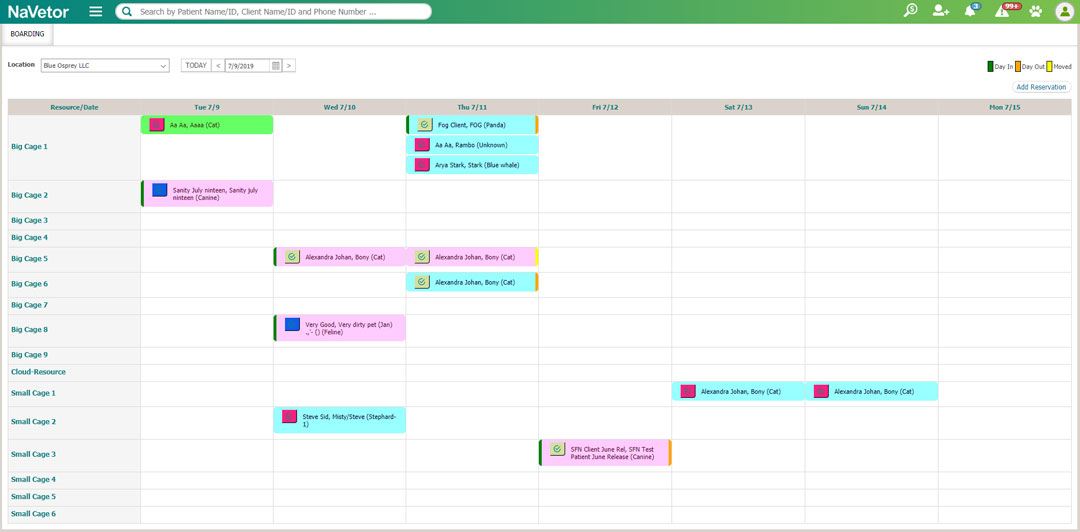
New Boarding Module
NaVetor will now have a Boarding Module available within the program, at no additional charge. To access the Boarding Module, go to Scheduler > Boarding.
This new module is very robust, so it does take some attention to detail in setting it up. Please view this detailed setup guide to walk you through the setup process. Additionally, we will be providing a recorded walk through of the setup and use of the Boarding module during the week of July 15.

Client Address on Invoice
The client’s full address will now be listed on the invoice. If the client has a billing address within the profile, that address will be listed.
No billing address? No problem! NaVetor will pull the default client address if no billing address has been entered.
New Options for Patient Age Format
When entering a new patient through the registration screen, you’ll have a drop-down option to choose the format for the patient’s age.
With younger patients, it’s helpful to track age in weeks and days, rather than years and months. And wouldn’t it be great if your software automatically switched from weeks/days to years/months when appropriate, without having to manually update settings or demographic information?
With this NaVetor update, you can do just that. Simply navigate to Settings > Admin >> My Practice >>> Practice Settings and set the parameters to change age format to year and month after a certain age has been reached.

Form 51
This form has been updated so the year of the vaccine will be automatically selected based on vaccine/inventory entry into NaVetor. The practice’s full address will also now be located at the bottom of the certificate.
Vaccination Certificate
Instead of the inventory name displaying on the client’s printed invoice or certificate, it will now display the official vaccine name, which is less confusing for clients.
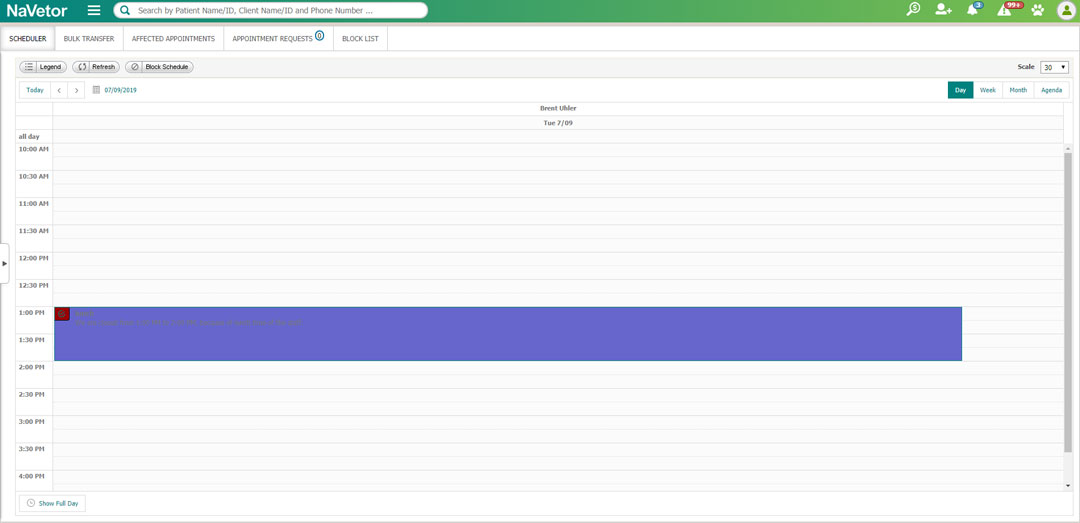
Appointment Block Descriptions
When creating a new block on the Scheduler, you can now add a description to the block. Navigate to Scheduling > Scheduler >> Block Schedule. Choose the Type, Date/Time, and which provider. You will now see the description box. This is a free form field that will show on the block, as well as when hovering over the block, so you have more flexibility in using your appointment calendar.

Search Bar
The Search Bar at the top of NaVetor has some additional search functions available. Now your staff can search for:
- Patient Name
- Patient ID
- Microchip Number
- Rabies Tag Number
- Client Name
- Client ID
- Client Phone Number
- Client Email
Also, there is an Invoices button available directly in this window, which will quickly take you to a client’s invoices, as well as a Notes button, which allows easy access to a client’s Encounters page.
(Please Note: The client name will appear in the order of TITLE + FIRST NAME + LAST NAME + SUFFIX.)
As a friendly reminder, our support team is here to help! Please feel free to contact us if you have any questions. Our goal is to keep you in-the-know regarding upcoming changes to our beautifully easy software, to help you understand the latest version, and to utilize it to its fullest capability.
You can reach us anytime by phone at (833) NaVetor or by email at support@navetor.com.

